

Hi everyone, Manda here with you today sharing a layout using the new Sweet Treat Scrapbook Kit.
I love sweet things and I am a huge Masterchef fan so when I was down in Melbourne last week I headed over to South Yarra to the AWESOME Adriano Zumbo cake shop - this place has to be seen to be believed, it is a mecca for cake lovers and of course I had to take photos while I was there so the Dear Lizzy goodies in the kit were perfect for a layout about my trip there.

 I don't like my hand writing very much and I wanted to keep the layout very clean so I typed my journalling and printed it out. I do have an old typewriter but to be honest it is a lot of trouble so I just did mine in Photoshop or you could use word, and used a typewriter font (you can find a lot of great free fonts at fontsquirrel.com)
 The only things on this layout that are not from the kit is some 6x6 paper from the add-on (which has sold out unfortunately) and a couple of tags I had laying on my desk. I will also have a video of how this layout came together over on my YouTube channel if you would to check that out.
Thanks so much for stopping by and don't forget you can get 10% off your entire shop order when you use MANDA10 at check out.
Supplies:
May Sweet Treat Scrapbook Kit
Shimelle True Stories Wood Buttons
Dear Lizzy Accent & Phrase Stickers
I love sweet things and I am a huge Masterchef fan so when I was down in Melbourne last week I headed over to South Yarra to the AWESOME Adriano Zumbo cake shop - this place has to be seen to be believed, it is a mecca for cake lovers and of course I had to take photos while I was there so the Dear Lizzy goodies in the kit were perfect for a layout about my trip there.

This was a fairly quick layout to put together because I decided to let the bright colours of the background shine, I didn't want the finished page to look too busy.


Thanks so much for stopping by and don't forget you can get 10% off your entire shop order when you use MANDA10 at check out.
Supplies:
May Sweet Treat Scrapbook Kit
Shimelle True Stories Wood Buttons
Dear Lizzy Accent & Phrase Stickers
It's the first wednesday of the month and that means it is time for a new sketch and this month we are going with something that is open to a whole lot of interpretation!

As you can see you could use multiple photos or move the photo to a different place, so many different options. Here is what I made:
 As you can see I switched mine up by cutting the squares diagonally then mixing the papers.
I used the January Pocket Life Kit for this layout (which is still available) as well as the Dear Lizzy Accent Sticker Sheet.
So now we want to see how you interpret the sketch! To play along, create a page, card or PL filler card/page based on the sketch (feel free to flip it or move it about a bit, you can also use it to make a card or PL filler card) and then use the linky tool below to link us up to your blog or online gallery.
You have until 29 March (11.55pm AEDT) to link up and a randomly drawn winner will receive a $10 gift voucher to spend in the the Scrappy Canary Store
________________________________________________________________________________
Thank you to everyone who played along last month. February's winner is:

Congratulations Jane, please email me at hello@scrappycanary.com to claim your prize.
________________________________________________________________________________
Hi there, Manda here and I know it has been ages and ages since you heard from me so I thought I would drop in and share a layout I made with this month's Scrapbook Kit - Brave (which unfortunately has sold out).

I liked how the two Simple Stories patterned papers had stripes that matched so when I mounted one on top of the other they lines up perfectly giving an impression of shadow from the top paper.

 I didn't think my title through prior to starting the page and ended up with it being split on both sides of the photo which didn't tie together so well so I decided to use the Pretty Little Studio Arrows to link them together and also create a larger frame for the photo and embellishments.
As I said the Scrapbook Kit is sold out BUT we still have the Pocket Life and Embellishment kits available however they are going really quickly so if you want one you need to get in fast.
Thanks so much for stopping by, I hope you all have a wonderful week.
For a bit of a change I decided to do an 8.5x11 layout, I don't do many of these so rather than having a dedicated album for them I just put them in with my regular layouts (in 8.5x11 protectors) and I kind of like the way it looks when you are looking through an album and come across different sized pages.
I liked how the two Simple Stories patterned papers had stripes that matched so when I mounted one on top of the other they lines up perfectly giving an impression of shadow from the top paper.
My photo was quite large but I still wanted to utilise the frames in the kit, so I layered one on the vellum and used it to frame one of the flair - this is something I do quite a lot with frames and embellishments.
As I said the Scrapbook Kit is sold out BUT we still have the Pocket Life and Embellishment kits available however they are going really quickly so if you want one you need to get in fast.
Thanks so much for stopping by, I hope you all have a wonderful week.
Manda x
Hello everyone and Happy New Year! Manda here and today we are revealing the new sketch challenge.
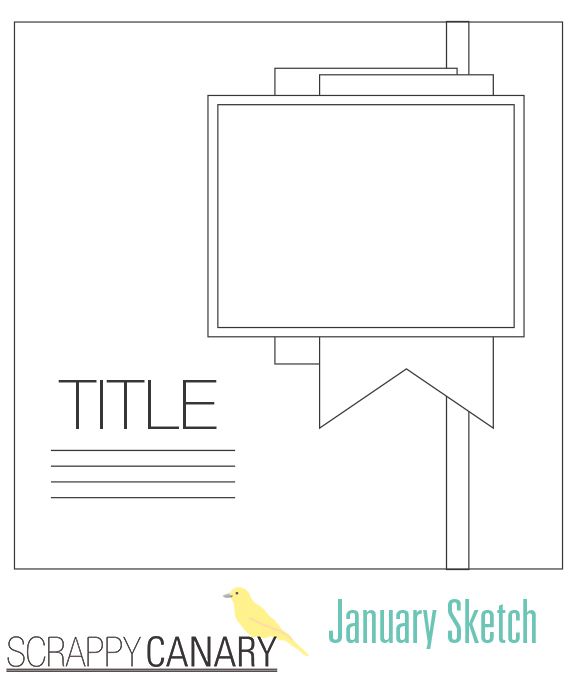
For my layout I used the December Sunshine & Lollipops Scrapbook kit and also some paper from the Summer Days add-on.

This layout is basically about my new year goals (I prefer the word goals to resolutions!) which are written down the right hand side of the layout. The photo is just one I took on the day after New Years when we went to the beach, I liked the idea of washing away the old year when I was thinking about my goals.
So now we want to see how you interpret the sketch! To play along, create a page, card or PL filler card/page based on the sketch (feel free to flip it or move it about a bit, you can also use it to make a card or PL filler card) and then use the linky tool below to link us up to your blog or online gallery.
You have until 01 February (11.55pm AEDT) to link up and a randomly drawn winner will receive a $10 gift voucher to spend in the the Scrappy Canary Store
___________________________________________________
This month's winner is:
___________________________________________________
Hi everyone! Manda here, hope you are all having a great week. It's time for our November Sketch Challenge. Here is the sketch:


You have until 30 November (11.55pm AEDT) to link up and the winner will receive a $10 gift voucher to spend in the the Scrappy Canary Store

And this is my take on the sketch.
I mainly used the October Wild Roses kit but when it came time for the title I decided to use some of my left over Shimelle Thickers from the September Kit because they were narrower and fitted in the area I wanted to put them. I also added the Freckled Fawn "happy" veneer from the embellishment kit.
The some of the DT members will also be sharing their take on the sketch over the coming weeks.
Now we want to see how you interpret the sketch! To play along, create a page based on the sketch (feel free to flip it or move it about a bit, you can also use it to make a card or PL filler card) and then use the linky tool below to link us up to your blog or online gallery.
You have until 30 November (11.55pm AEDT) to link up and the winner will receive a $10 gift voucher to spend in the the Scrappy Canary Store
_____________________________________________________
Congratulations to last month's randomly drawn winner
Congratulations Rhiannon please email us at: hello@scrappycanary.com to claim your prize
_____________________________________________________
Hi everyone Manda here and today I am sharing a layout I made using the July Road Trip Scrapbook Kit which I made for a challenge over at Creative Scrappers using the sketch below.

I am an avid lover of sketches as a starting point and quite often use them as inspiration. For this one I swapped the circles for triangles using a cut file Ashley Horton’s Etsy Shop – The Cut Shoppe called Tricky Triangles which is a full background piece but I only used part of it to reflect where the circles are on the sketch.

I used a piece of kraft card from my stash as a background, I had tried white but it wasn't looking right. For the background behind the triangles I also used a piece of patterned card, originally the kraft was meant to show through but made it look wishy washy. This month I also got the Scenic Route Embellishment Kit and the Day Trip Pocket Life Kit so I had some extra goodies to use when I layered under my photo and added embellies. I added my title and used a piece from the Teresa Collins sticker sheet in the PL kit to ground it so it wasn't just floating in the middle of the page. I also used some of the cork chevrons from the June Kit.
 Once I had finished the layering under the picture and frame my page had a little something missing so I used the Studio Calico Star Sequins from the main and some Candy Dots in Canary from the shop to add some clusters diagonally across the page to help balance the layout.
 So that's it from me this week. Don't forget if you make something using the kits to come on over and share it in our VIP Facebook Group because we love to see what you create.
Hey everyone, Manda here. Firstly let me welcome you to the first day of Scrappy Canary! Ruth and I have been busy getting things ready to go and as you can see the blog has had a bit of a makeover and the new website will launch soon but we will let you know as soon as it is ready to go.
So today I am going to share a layout with you that I made with the June Cocoa & Chocolate kit. I loved this kit so much especially the exclusive from Wilna Furstenburg, so much fun!

I loved this paper from Echo Park but it was a little bright for my liking so to start off I used a make-up sponge and put a light coat of white acrylic paint, not enough to cover the patter, just to soften it a little.

For this page I challenged myself to mostly the sticker sheet and I think I did pretty well. I did add a silhouette cut (from The Cut Shoppe on Etsy) and because I wanted the heart to match the little sticker heart I used a piece of 6x6 paper (that was not in the kit) that matched.

I am saying some the the Wilna acrylics for another project so I only used these little hearts that came in a separate add on. If you would like to see how the layout came together you can see it on my YouTube channel.
If you would like to share anything you made using your Polly Scrap Kit you can share it on our Facebook Page or in our special subscriber VIP group. We would love to see your projects.
Have a great day,
Manda xxx
Hi everyone, Manda here and today I am sharing a layout I made with the April Scrapbook Kit - French Kiss which is still available in the Polly Shop. 
I started out with the Studio Calico Wanderlaust paper which I cut the centre out of and used as a matt for the whole layout. I then added the Kelly Purkey Mon Ami paper and then layered the two papers on to again, this time using the b-side of the KP.

I started out with the Studio Calico Wanderlaust paper which I cut the centre out of and used as a matt for the whole layout. I then added the Kelly Purkey Mon Ami paper and then layered the two papers on to again, this time using the b-side of the KP.
I used one of the stickers from the sticker sheet that said you and me which is something I probably wouldn’t use and covered it with some washi and added “rise” and “shine” to relate to the breakfast theme of the page. I also took some other pieces from the sticker sheet and used foam dots to give dimension. The photos on the dark paper got a little lost so I ended up using my white Uni-Ball pen to add some faux stitching.

I even added journalling to this page - which is a big event for me but I am trying to get better at it. I also took the little cork speech bubble and stamped on it with some stayz-on ink and highlited it with some more white gel pen.
So that's it from me this week hope you all had a great weekend and got some crafty time in. I will be back with some more pages soon - Manda x
I even added journalling to this page - which is a big event for me but I am trying to get better at it. I also took the little cork speech bubble and stamped on it with some stayz-on ink and highlited it with some more white gel pen.
So that's it from me this week hope you all had a great weekend and got some crafty time in. I will be back with some more pages soon - Manda x
Hey Polly peeps, it's Manda here and today I have 2 layouts for you :)
The first one was using just the March Spearmint Leaves Scrapbook Kit:


Have a great week,
Manda xxx
The first one was using just the March Spearmint Leaves Scrapbook Kit:
I have a lot of travel photos from my Europe trip (which must have been 10 years ago now - I'm getting old) and I wanted to scrap them for my travel album I am putting together. I am going to admit the photos aren't that great, basically I had a point and shoot film camera so I was very aware of limiting how many photos I took. As a result some of the photos such as this are less than spectacular but they are all I have so I cropped my 4x6 down to a 4x4 to focus on what was important and then because I had a lot of white space and a short title I put my title directly onto the photo. (FYI I am taking scans of the original photos which are already in a photo album).
My next layout is using both the March and leftover papers from the FebruaryKit. At the start of the month I was lucky enough to go to a Heidi Swapp/Becky Higgins masterclass in Melbourne where I met Carol and Lauren for the first time (I cannot believe we hadn't run into each other before this!) so of course a layout had to be made.
Have a great week,
Manda xxx
Hey Polly peeps, hope you had an awesome weekend full of crafty goodness. I am back today with a process video of how I made the page below with the March main kit.

 To finish off I added some water colour paint after I had stopped filming so this looks a little different to how it finishes off in the video.
I hope this gives you some ideas on how to use your kit. Thanks for stopping by and have a great week. Manda xxx
I did cheat a bit this month and use some Amy Tangerine Plus One washi that is available in the Polly Shop but if you wanted to make a similar page you could always use the skinny washi that was in the February kit and also added some enamel dots from last month's kit and cardstock from my stash. For the word thickers I did a bit of cosmetic surgery to the word "cherish" to give me the title.
I hope this gives you some ideas on how to use your kit. Thanks for stopping by and have a great week. Manda xxx
Hey everyone, happy monday! It's Manda here and today I am sharing with you a layout I made using the Passionfruit Souffle kit.


Thanks so much for stopping by.
Happy scrapping!
Manda xxx
This is one of my favourite kits to work with so far, I went crazy with the Simple Stories Homespun chipboard, I have pretty much killed it. I also took advantage of the Sn@p Insta Cards and cut them up for layering.
I have done a quick process video talking through how the layout came together for me, which you can see here:
Thanks so much for stopping by.
Happy scrapping!
Manda xxx
Hi everyone, Manda here today I am sharing with you my first process video on how I used the Passionfruit Souffle kit to create the page below. Hope you like it :)

Hi, Manda here today I am sharing a video walking through the goodies you will be receiving in your February Kit. This is my first video ever so I hope you like it. Have a great week!
Happy Monday! Today I have a quick post to share a layout I made using the January Almond Biscotti Scrapbook Kit. I am in love with the pretty pastels and the dreamy feel of this kit which were perfect for this photo.


 So I encourage you all to have a play with different alpha stickers and styles and use a long title to give a typography focus to your pages. Thanks for stopping by and don't forget to link up any projects you make using Polly kits and share it on our Facebook Page or on Instagram with #pollyscrap.
I loved the stamps in this kit and can see myself using them for tonnes of projects but with this project I wanted to concentrate on playing with the title so I limited using them to just twice. I used the Heidi Swapp ephemera to layer under the photo and stamped on one of the tabs, I also made my own tabs using the washi tape and a tab punch.
I am in love with typography at the moment and because my title was a long one (and this is the edited version!) so I knew I would have to use both alphabets but in such a way that I could get all the words I wanted. I decided to go with look similar to the "subway art" look that has been popular recently and that way could double up on the word Kitty and it still worked.
Hello again, today I am sharing a mini album I made with December's Watermelon Gelato Scrapbook Kit. Mini albums are my new obsession, they are a great size for just documenting a single event and make fabulous gifts. I am going to walk you through the steps I did to make this (I didn't think to take pictures until I was done - sorry about that).

 Next I took some white acrylic paint and a stiff paint brush and lightly painted over the patterned paper, you need to make sure you keep it thin because otherwise you will not be able to see the paper. Then I took a stencil and applied some texture paste. If you don't have a stencil you could cut one with your silhouette or even by hand. Then I added some watercolour paint when the paste was almost set to give the stencilled hearts some colour.
 Once the base is complete you can get to decorating it. I cut a frame from the Dear Lizzy paper coloured it with some watercolours, then cut some of the transparency to make a sequin pocket. (These ones are from my own stash but there are some gorgeous wooden ones in the kit). Finally I tied the whole thing together with some seam binding I had laying around.
Hopefully this has given you some ideas to create your own mini using the December Kit. If you make one (or any other project with your Polly Kit) make sure to share it on our Facebook Page or on Instagram with #pollyscrap.
For this one I started with a pre-made wooden album which I got from a local craft store but you could easily make your own cover with some chipboard or thick card.
Next step was to adhere the patterned paper to the base, I cut the paper slightly bigger than the album just in case and then used modge-podge to stick it down, once it was dry I trimmed it down.Hopefully this has given you some ideas to create your own mini using the December Kit. If you make one (or any other project with your Polly Kit) make sure to share it on our Facebook Page or on Instagram with #pollyscrap.
Hello there, happy new year! It seems like a long time since I have posted but I have been working away at some new projects and am looking forward to doing lots of scrappy projects here at Polly! in the coming year.
Today I wanted to share with you a new page I made with the December Main Kit - Watermelon Gelato. This is such a fun, bright kit that instantly brings summer to your mind, perfect for scrapping those holiday pics.
With this layout I decided to try something different by doing an 8.5x11 layout which is something I hardly ever do - I think I have made maybe two ever!
 This page is about me gardening which is also something I seldom do because I manage to kill everything. So this year I wanted to grow some tomatoes and other vegetables. I thought the colours in this kit were perfect for this photo as well as the strawberry embellishments. Also I loved the little "The Good Life" sticker for a gardening page (most of you probably don't remember that show, my parents watched re-runs all the time, I think they wanted to go all alternative like Tom and Barbara), I think these Mambi stickers are perfect for adding an accent over blank space on photos.
 I used a sketch by Shimelle for this layout but I wanted to add a couple more layers. I also wanted to make the embellishments a little more layered so I cut some of the circles from the Maggie Holmes Fine China Paper.
This page is made completely from the main kit however once I finished I realised I had actually cut my paper 11.5x8, clearly I was having a very ditzy moment, so I needed to strip the top and then mounted the whole layout on some pink cardstock from my stash.
I hope that has given you a few ideas for how to use your kit and remember if you share your work on facebook or instagram make sure you use #pollyscrap so we can check out all your fabulous creations.
Have a great day,
Manda
Today I wanted to share with you a new page I made with the December Main Kit - Watermelon Gelato. This is such a fun, bright kit that instantly brings summer to your mind, perfect for scrapping those holiday pics.
With this layout I decided to try something different by doing an 8.5x11 layout which is something I hardly ever do - I think I have made maybe two ever!
This page is made completely from the main kit however once I finished I realised I had actually cut my paper 11.5x8, clearly I was having a very ditzy moment, so I needed to strip the top and then mounted the whole layout on some pink cardstock from my stash.
I hope that has given you a few ideas for how to use your kit and remember if you share your work on facebook or instagram make sure you use #pollyscrap so we can check out all your fabulous creations.
Have a great day,
Manda
Hi everyone, Manda here today and I wanted to share a little mini album I made with the November Scrapbook Kit. I used some shipping tags as a base for this album however if you didn't have any you could just cut a piece of patterned paper to the same size.
It is a very quick process to make the base, all I did was cut a couple of pieces of paper to the shape of the tags. The Studio Calico Abroad paper didn’t really work for me so for that one I stuck it to the actual tag, the others are just cut in shape to match. Then I just embellished
One of my favourite things in the kit was the Maggie Holmes ephemera pack, which are still available in the store (I got a second pack because I loved them so much!), and I have mainly used that to embellish the tags, the other main part of embellishments is a piece of Dear Lizzy cut apart paper from the Polka Dot party collection. Then I just took the whole thing to the sewing machine and added some stitching.

One of my favourite things in the kit was the Maggie Holmes ephemera pack, which are still available in the store (I got a second pack because I loved them so much!), and I have mainly used that to embellish the tags, the other main part of embellishments is a piece of Dear Lizzy cut apart paper from the Polka Dot party collection. Then I just took the whole thing to the sewing machine and added some stitching.
 The adorable camera veneer is exclusive to this months kit and I just used my Crop A Dile to punch a hole through it. To finish off I just used a ring binder and added ribbon. As you can see it is a fairly easy process and if you didn't have shipping tags you could also use Project Life cards or a cut apart 12x12 paper. I am also going to make some christmas themed ones to give as gifts.
Hope you enjoyed this project - Manda xxx
Hey there, today I am sharing a couple of layouts that I have made using the new November Scrapbooking Kit. I totally loved this kit, it is full of lots of pretty papers and the gorgeous Maggie Holmes Flea Market Ephemera Pack. This is also the first kit to include a stamp which is lots of fun.
My first layout was made using a couple of pieces from the Dear Lizzy Polka Dot Party collection.

 For the title of this one I actually used the Thickers from the October Kit. This was because the black ones weren't working on the patterned paper I had used and also because I thought the pretty gold thickers were perfect for a page about going for High Tea. (Stash items used on this page were white cardstock, Heidi Swapp Colour Shine in gold and a stencil).
I hope these pages have given you a few ideas on how to work with your kit, remember to share your pages on the Polly Facebook Page or share your instagram pics with @pollyscrap because we love to see what you make and we might even share it here on the blog.
Have an awesome week - Manda x
My first layout was made using a couple of pieces from the Dear Lizzy Polka Dot Party collection.

Each month I try to do a "Right Now" page which has a current photo and 5 things I am doing or loving at the moment, it's just a fun way to look back over the year. I cut up the DL Fantastic Favours page to use as journalling spots and also as a tag at the top to put the month. I also fussy cut some roses off the Maggie Holmes Jenna Paper and used the other side as a photo mat. The layout has been matted on a piece of cardstock from my stash but everything else is included in the kit.
My idea with this layout was to pretty much only use the MH Ephemera Pack. I used another piece of the Jenna paper as a photo matt and then got busy layering.

I hope these pages have given you a few ideas on how to work with your kit, remember to share your pages on the Polly Facebook Page or share your instagram pics with @pollyscrap because we love to see what you make and we might even share it here on the blog.
Have an awesome week - Manda x
Hi everyone, Manda here again and as promised I am going to share another layout I made using the October Main Scrapbook Kit.
 One of my favourite things in the kit was the Echo Park Embellishment stickers. This was because a) it had another alphabet and lets face it we can never have too many of them and b) I love that you can use pieces of these sticker sheets for layering.


I have never really liked coffee but as I have got older I have needed a caffeine hit most afternoons so I have turned to the trusty mocha and it MUST be served in my Jamie Oliver mug.
For this layout I added some cream cardstock from my stash as a background. Then I got to work layering using various papers in the kit. I also layered some of the tags under the photo and used the border stickers in pieces (like washi tape) and stitched the in place.

As I am pretty new to the team, you may not know that I have a journalling phobia of sorts, which you wouldn't realise because I have actually done it on my last two projects here. I don't like doing it, I can never think of what to say and I dislike my handwriting but I am trying to get better. For me a lot of times the pictures will tell the story for me and other times I am scrap the picture because I think it's pretty LOL. But photo's like this one mean nothing without journalling so I am trying to write a little bit just to remind me what story I was trying to tell. If you are like me then the best tip I can offer is just write a few lines, whatever comes to mind but do it on a scrap piece of paper first.
Thanks for joining me again, hope you all have a creative weekend.
Love,
Love,


